To set up Outlook 2007 for IMAP, perform the following steps (click here for POP e-mail instructions):
- In Outlook, select Tools / Account Settings.
- On the Email tab, click the New button.

- If prompted, ensure that the Microsoft Exchange, POP3, IMAP, or HTTP option button is selected, and click the Next button.
- Select the Manually configure server settings or additional server types check box.
- Click the Next button.
- Ensure that the Internet E-mail radio button is selected, and click the Next button.
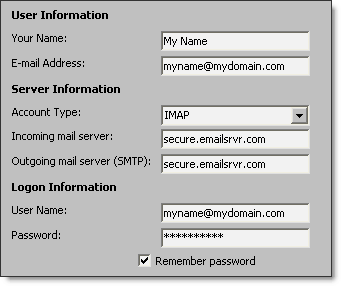
- Enter the following information:
- Your Name—Enter your first and last name. This is the name that will appear in the From field of messages you send.
- E-mail Address—Enter your entire email address (e.g., [email protected]).
- Account Type—Select IMAP from the drop-down menu.
- Incoming mail server—Enter the secure server name: secure.emailsrvr.com
- Outgoing mail server (SMTP)—Enter the secure server name: secure.emailsrvr.com
- User Name—Enter your entire email address (e.g., [email protected]).
- Password—Enter the password for your email account.
- Click the More Settings button.
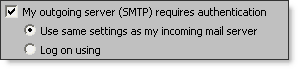
- Click the Outgoing Server tab.
- Select the My outgoing server (SMTP) requires authentication check box. Leave the default setting, Use same settings as my incoming mail server.
- Click the Advanced tab.
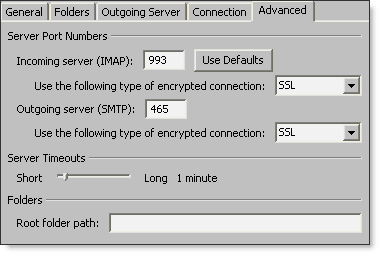
- In both of the Use the following type of encrypted connection drop-down menus, select SSL.
- In the Incoming server (IMAP) box, enter the secure incoming port: 993
- In the Outgoing server (SMTP) box, enter the secure outgoing port: 465.
- Click the OK button.
- Click the Next button.
- Click the Finish button.
- Click the Close button.
IMAP Folders
Folders should sync automatically with an IMAP account; however, if you have added folders in Webmail and they are not showing in Outlook, perform the following steps:
- Select Tools / IMAP Folders.
- Click the Query button.
- Select the newly added folder(s), and click the Subscribe button.
- Click the OK button.
- Restart Outlook to update the folder list.
How to setup Outlook 2007 with POP Access
To set up Outlook 2007 for POP, perform the following steps:
- In Outlook, select Tools / Account Settings.
- On the Email tab, click the New button.

- If prompted, ensure that the Microsoft Exchange, POP3, IMAP, or HTTP radio button is selected, and click the Next button.
- Check the Manually configure server settings or additional server types box.
- Click the Next button.
- Ensure that the Internet E-mail radio button is selected, and click the Next button.
- Enter the following information:
- Your Name—Enter your first and last name. This is the name that will appear in the From field of messages you send.
- E-mail Address—Enter your entire email address (e.g., [email protected]).
- Account Type—Select POP3 from the drop-down menu.
- Incoming mail server—Enter the secure server name: secure.emailsrvr.com
- Outgoing mail server (SMTP)—Enter the secure server name: secure.emailsrvr.com
- User Name—Enter your entire email address (e.g., [email protected]).
- Password—Enter the password for your email account.
- Check the Remember password box, if you want Outlook to check for email without prompting you to enter your password.
- Click the More Settings button.
- Click the Outgoing Server tab.
- Check the My outgoing server (SMTP) requires authentication box. Leave the default setting, Use same settings as my incoming mail server.

- Click the Advanced tab.

- Check the This server requires an encrypted connection (SSL) box.
- In the Use the following type of encrypted connection dropdown menu, select SSL.
- In the Incoming server (POP3) box, enter the secure incoming port: 995
- In the Outgoing server (SMTP) box, enter the secure outgoing port: 465.
- A POP connection normally removes the email messages from the server during download. If you would like to leave copies on the server, select the Leave a copy of messages on server check box. To avoid exceeding your account’s storage limits, indicate whether the server should delete messages after a certain number of days and/or delete messages when you manually delete them from the Deleted Items folder.
- Click the OK button.
- Click the Next button.
- Click the Finish button.
- Click the Close button.